My Cards and Crafts

BLOG CANDY


Followers

Monday 26 January 2009

How to make a Bookmark book

Bookmark Book Tutorial

These books are easy to make and fun to give as gifts.
You will need these for the book:


2 Rulers one to measure with and one metal ruler to act as a straight edge to cut and score along.
Craft knife
Pencil
Embossing tool or similar to score with
Glue
A4 size thin card
Patterned paper
Thicker card
Ribbon
For the bookmarks you will need:
Card
Glue
Paper, stamps or collage items
Hole punch
Eyelets
Hammer
Punch
Thread

First decide on the size of your bookmarks this will determine the size of the book. For this I am making a mini bookmark book that will be 4 inches, mini bookmarks measure 1.5 inches x 3.5 inches.
1) Measure and cut the A4 size thin card adding an extra inch. So you will be measuring 5 inches


2) Now measure and mark one inch from the bottom and using the metal ruler score along with the embossing tool. Fold along the scored line.


3) Flatten out and fold in half


4) Open out and fold the left hand side towards the middle.


Repeat with the right hand side.


5) Open out and fold the one inch scored piece up and secure each end with glue or double sided tape this forms the inside pocket.


6) Now fold the card like a concertina this forms the book. You will now be making the covers.


7) Measure the height and width of the book and cut a piece of thicker card according to those measurements. You are measuring the front left and back right sections only this is the flat part of the concertina book.


8) Spread glue over one side of one piece of card and place onto the back of the patterned paper repeat with the second piece, it will look like this.


You need plenty of space around the cards as you will need it in order to mitre the corners.


9) Cut the pieces out like this


10) Mitre the corners so they look like this


11) Fold each side over and glue down so it looks like this


12) Take one piece of covered card and either glue or use double sided tape to secure to the left hand side of the book this will be the front cover of the book.


13) Now place a length of ribbon to the centre of the back of the right hand side of the book like this going width wise.
I coloured in part of the ribbon so it would show up this will be used to tie the book so it will close.


Now add the second piece of covered card as you did the front cover. Tie the ribbon to the front to keep the book closed like this

This is the book completed. You can now embellish the front of the book as you wish.


All you need to do now is make the bookmarks and insert them into the pockets. You can decorate the inside of the book as well if you want to.
I hope that will try making these as they are easy to do and make lovely little gifts for anyone who loves reading.
Paula aka Wulfcwen

Fe-Fe's Photo Challenge


Fe-Fe has a challenge on her blog to put up the 6th picture from your 6th folder this is mine

My son Dean in May 2008 at Muscle Mayhem Competition he came a respectable 2nd in his first ever Body Building Competition.

Challenge 6 entry


This is my entry for Challenge 6


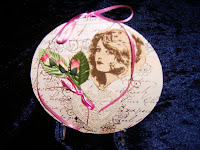
I chose to go with an altered CD the first one I have ever made. I also made a cover for the CD so it can be stored away in its own cover.


I used some script paper as the background that was mounted on some card to give it strength. I used a floral stamp to create a frame. Then I used a stamp for the womans head that was stamped onto a background that complemented the colour of the printed paper. A lace heart was used to create a romantic feel and the roses are tied with pink ribbon and the same ribbon was used to finish the look. For the cover I used the same script paper and face but added three hearts that were stenciled and a small vase of roses to finish it off.
Click onto the pictures to see the details.

Bookmark Book


I love making these and they make such lovely gifts for the avid reader. This one is earmarked for someone already.

I make mini bookmarks as well and they are really good for using up small pieces of card and paper.

These are 5.5inches long I made them using some card and background paper. I used stamps to embelish them in gold and silver making a set of 2 silver and 2 gold.

New Stamps


I bought myself some new stamps from Tanda Stamps and I am very happy with them. Some are unmounted whilst others are on wooden blocks.

I have yet to mount the unmounted stamps and will do that later on. I just had to share them as they are the first stamps I have bought.

My other stmaps were given to me and I love them but these are the first ones I have chosen for myself.

I am using them already and love the results stamping is fun and easier than I thought it would be.

Sunday 18 January 2009

My entry for the 5th Challenge on Crafty Pad


This is my entry for the Challenge on The Crafty Pad.

We were to use the image of Faith and to make a card with it.

For the background I used paper that I rubbed Distrees Ink on (Tattered Rose) and then using a pencil sharpener I placed wax crayon shavings over it, using parchment paper and a hot iron I melted the wax into the paper.

I cut the paper to fit the back and front of the card and used the image ,stick on ribbon and embelishments along with a Happy Birthday stamp that I embossed to finish it off.

My art and home


This Blog will be about my art work and how I made the cards and other art along with things about my home.

I enjoy making all sorts of things and learning new techniques.

I have recently learnt how to make a Fat/Chunky page and really enjoyed it.

Along with this I have made background paper using the scrunch method.

I scrunched up paper opened it scrunched again and repeated until I was happy with the results. Then I rubbed Distress ink over the paper in two different colours. The end result is not that bad as you can see.
All my art work is made sat at the dining table in the living room and any messy work is completed in the kitchen.
My home is a one bedroom ground floor flat and we are lucky enough to have a garden. This means I can work in the kitchen or living room and see the garden. Gardening is something I love but not when it is cold.
Having osteo arthritis and a few other things like IBS and dizzy spells means I cannot always do what I want to do but get around it one way or another.
Art and craft is one way of keeping my imagination working and maintaining my sanity, although some would disagree LOL. I have made new friends with my art work and enjoy joining in new challenges and finding new ways of doing things.
My husband loves playing his games on the computer and playing his guitar whilst I create new cards, ATC's or make a new Stuffy. He has problems with his heart and osteo arthritis as well.
So this a little bit about me and what I do.
More will come as I make new things so keep looking in to see what I am up to.
I am not the worlds greatest at keeping a blog but will do my best to keep this one going.